- Follow us:


Tuesday, September 4th, 2018
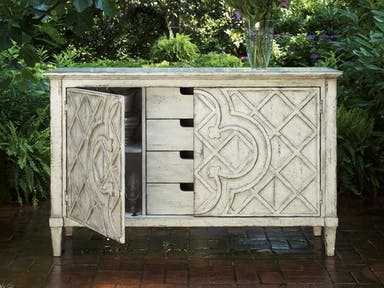
Make the dining room more splendid with the Fine Furniture Design Dining Room Jardin Lattice Console 1352-856.
The lattice or latticework is a kind of open work framework that has crisscrosses or strip patterns. These are building materials that are usually metal or wood. This design is made by crossing the strips in order to create a weave or grid.
Latticework isn’t all design or all about beautification. It can also be functional, for instance, this can aid proper airflow through a space. This can also serve as a truss when used in as a lattice girder. Lattices are also used as a means to have privacy when you use a lattice screen.
Latticework, during the Classical period, were made of wood or stone. This was known as the transenna (plural form: transenne).
The Indian latticework was chiefly featured in many noble and rich peoples’ homes. They often surrounded the verandah or what they refer to as the baramdah. The upper levels of these rich Indian homes overlooked busy streets but they were shielded and given privacy by the latticed screens (some were even made of stone and were known as jalis). The private pools were also kept from the prying eyes of people with these screens.
The ornamental beauty of lattice has been around for thousands of years. They are found not just in India but in other nations throughout the world. The patterns and designs often depict the same visual theme or the style of the homeowner or the culture of that locality.
As mentioned, in India, this is a symbol of wealth. In the Middle East as well as North Africa, the latticework is often used on windows in order to keep the rooms cool. This also provides privacy for the homeowners.
Latticework isn’t just for windows and doors. When you’re feeling up to it, you can also use this as a decorative tool on your skylight or simply laid on the ceiling.
Latticework Divider
Architecture has never been the same after latticework has been introduced to the world of design. The solid, void or transparent doorways became more exciting.
Latticework is a kind of architectural flair. The Taj Mahal in India shows a great amount of latticework. And, come to think of it, the Eiffel Tower is a towering structure of latticework that’s the subject of many photographs for many years.
Even when talking contemporarily, where everyone seems to be embracing the minimalist way of life, people still find beauty and function in the patterns that latticework offers.
Imagine a latticed divider separating the stairs from the rest of the open space layout first story of your home. It can be made of light steel and painted in a contrasting color from the rest of the walls and the stairs.
Latticed Walls
Whether you want to refer to it simply as lattice or the more unfamiliar terms trellage or trelliage, the look offered by these patterns are making a wonderful comeback in recent years.
This décor technique isn’t easy to do. If you intend on making a DIY project with this pattern, well, you’ve got a lot of training to do. If you want to have latticework on your gorgeous walls, then you might have to commission a professional to do it.
A good room to begin in is the powder room where you can use a trellis overlay. This can make the room appear bigger. Try this on a mirrored surface and you can even magnify the space that this design element provides.
The lattice patterns can also be used as a part of a molding. Other uses for lattice include –
Tags: lattice, latticed divider, latticed interiors, latticed walls, latticework, McCreerys, McCreerys Home Furnishings
Posted in Architectural Elements, Interior Design 101, Interior Design Elements, Window Design | Comments Off on Lattice: A Gorgeous Element
Monday, September 3rd, 2018

Figure 1. Imagine your veranda donned by the Maitland-Smith OutdoorPatio JARDINIERE 8110-22. Its Verdigris patina brass, brass liner, and inlaid black stone would be a wonderful sight to behold.
It’s officially the beginning of Fall. No matter what the season, though, people tend to enjoy spending time outdoors even when they just sit on the balcony, porch, veranda or the deck. But wait, can you tell the differences in structure and features with each one?
The Porch (and Veranda)
According to the Encyclopedia Britannica, the porch is a roofed structure, usually open at the sides, projecting from the face of a building and used to protect the entrance. In the United States, this is what’s referred to as the veranda.
So there you go, you have two terms having just the same meaning and purpose. But there is just a little evidence of the existence of this structure prior to the Classical antiquity. There were many Egyptian wall paintings that indicated the occasional use of porch on some houses.
In Greece, the Tower of the Winds in Athens was a porch that had two columns carrying a pediment. The Romans, on the other hand, had colonnades which were used as porches. These all faced the street. This kind of porch was also seen up until the Early Christian basilicas’ creation. The porch was used as a formal entrance in old structures such as the Basilica of Old St. Peter’s.
The French in Burgundy developed porches that had vaulted structures. These showed great heights and were sometimes even as long as the whole church structure. An example of this fine architecture is the Vézelay abbey church.
If these are exciting enough for you, wait till you learn about the Gothic era and the two porch types that were then created as ecclesiastical buildings. The first one is a tiny, gabled porch that either projected from the south or north walls of a nave. The other one is what’s referred to as the galilee which was constructed so beautifully that it’s short of being a separate building.
The Germans were even more flamboyant in their porch designs. They had theirs frequently styled with tracery, canopies, cusping, etc.
In the Renaissance, porches were chiefly colonnaded porticos.
A Balcony
The Collins English dictionary defines a balcony as any platform on the outside of a building, above ground level, with a wall or railing around it. In a cinema or theater, the balcony is an area of seats above the main seating area.
Would you believe that balconies come with a two thousand year history? The term balcony was derived from the Italian term balcone meaning, a scaffold. The earliest types of balconies have been seen to date back for more than 2,000 years.
The balcony was originally created to increase air circulation especially during the hottest climates in Ancient Greece. Today, the balcony is integral to a building’s façade because it gives the property a more stylish vibe. Plus you get more space to roam in.
Balconies in the UK are Juliet balconies which date all the way back to the late Georgian era. They were created by architects to give structures a prestigious look. They were originally made of wrought-iron and were rectangular and filled the whole span of windows.
If you have traveled in Europe, you might have noticed how the finest balconies seem to have been constructed there. Most even have overlooking views of water-cooled gardens and courtyards.
The Deck
The Merriam-Webster dictionary is something resembling the deck of a ship such as a story or tier of a building or a flat-floored roofless area adjoining a house.
Wood decks can have wrought-iron furnishings. These structures can be used as a part of landscaping, an exterior part of a house, or as an alternative to the patio.
Tags: balcony, balcony history, deck, deck design, deck history, McCreerys, McCreerys Home Furnishings, patio, patio design, patio history, veranda, veranda history
Posted in Interior Design 101, Interior Design Elements, Outdoors Style | Comments Off on Porch, Veranda, Deck and Balcony? Do You Know the Difference?
Friday, August 31st, 2018
FFDM Brentwood Collection: The light touch of yellow on the lampshade, artwork, area rug and accent chair makes it a noticeable yet non-glaring element inside this beautiful room.
It’s now whether you like or have a disdain for the color yellow. The thing is, it is a vibrant hue that can stand on its own or help highlight another hue. If you’re thinking of ways to redress your home, then going for this unconventional color just might be the best way to go and we’ll tell you why –
The Physiological Magic of Yellow
Color, as you probably already know, can affect us in so many ways. It can make you mad, it can make you cry, it can even make you hungry or laugh. The right color combinations can bring the needful positive psychological effects like optimism, productivity, and happiness.
Yellow is both trendy and retro. It is used in contemporary settings while it can also bring back memories of interior designs of the past.
Just be careful in choosing yellow because its negative tone could bring about anxiety.
Positive Interiors with Yellow
When you use the right tint or shade of yellow, you bring into your home a unique impact. It can instantly become a cheerful space. And when you decide to use it as an accent color, it makes the guests feel warm and welcome. Use this color in your breakfast nook and you will wake up to a great start each day.
Other spaces can use yellow also as a warming tone. When paired with dark tones (the darkest being black), yellow tends to be highlighted so you can combine, say, a yellow couch with dark-colored interiors.
Energize with Yellow
Crafting the right kind of ambiance, especially in a workspace, is an important part of interior design. Whether you like taking home your work or if you already set up a home office, then what you need is a space that is dedicated to organization and productivity.
But how do you go about with this? It’s not enough to just paint the walls yellow. Do this and it gets jarring. Apply too little and you end up with a dull and monotonous room.
What to do, what to do?
You can beautify and energize at the same time when you fuse yellow and gray. This fusion of a refined color and its bright counterpart is, unarguably, a popular go-to color combination. Your home office would do well with this color fusion and so could your living room and the bedroom.
When you decide to accessorize with yellow, then you energize your home in a different way. Let go of those neutral curtains and replace them with the luscious yellow sheer curtains. Let in the light and organize with light yellow desk paired with a gold-colored chair.
Be Cozy with Yellow
When you grow tired of energetic and productive hours, and it’s finally time to wind down, then you can still depend upon yellow to help you cloak your home with the needed hominess.
Use a mellow yellow sort of yellow as a backdrop in the living room. This is a great way to move away from the traditional neutrals and to move towards the elegant and vintage beauty that this tint of yellow offers.
Coupled with the right kind of lighting fixture, you are sure to amaze your guests as they marvel at the chic elegance that your living room will evoke.
Yellow is also an amazing color when you want the eyes of your guests to rest on a gallery wall. This accent wall need not be bold all the time. You can also use a pale tint of yellow and then have your artworks hung.
‘Talk of texture in the living room or the home office.
Tags: McCreerys, McCreerys Home Furnishings, psychological effects of yellow, yellow, yellow color palette, yellow color psychology, yellow interior design, yellow interiors
Posted in Accents, Color Schemes, Interior Design 101, Interior Design Elements | Comments Off on The Yellow Rave
Thursday, August 30th, 2018
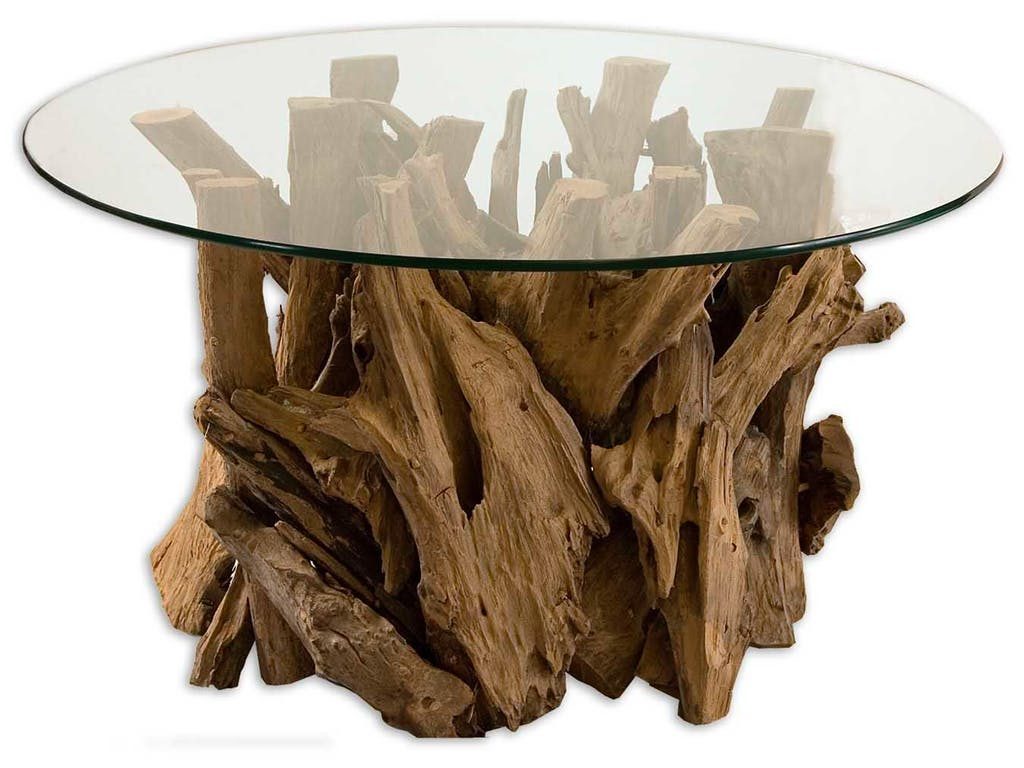
Uttermost Living Room Driftwood Glass Top Cocktail Table 25519
Outdoor furnishings are unique because they need a special kind of shopping method – you need to consider materials that won’t be affected by the ravaging elements outside. You also need to make sure that the piece will last for many years. Teak is one such material that is often used to craft patio furnishings.
Teak comes with a beautiful golden color and is known to be highly durable. It has natural rubber and oils, thus, it can easily withstand Mother Nature when she wreaks havoc. This means that a teak furniture would be protected from moisture, insects and wood rot, and you will also be ascertained of a durable patio piece for many years to come.
While teak is known to be great for outdoor use, you should still be armed with the right shopping tips when you finally go out to shop. Here are some things that you need to consider when buying teak for your patio –
Check for Excellence
Teak wood is harvested from a mature teak tree. This is the type of wood that can endure through many weather difficulties especially when it is properly treated.
The proper way to treat, say, a teak table is to wash it first with soap and water and then using a bristle brush, you brush away the dirt. Allow the wood to dry then apply the teak brightener in order to restore its original hue.
You can then proceed to apply the UV blocking sealant and allow it to dry. This should last for about a year.
Check for Easy Maintenance
With a recent finish, you should be able to clean your teak furniture with ease. Just wipe away the dust and dirt and you should be fine. If the teak patio piece already has a stain, then you can use a baking soda treatment together with warm water.
Give it a few, gentle wipes and you should be fine.
Check for Handmade Pieces
Teak furniture pieces aren’t all the same. There are pieces that are fully machine made and there are others that are semi-machine crafted. What you need to look for is the handcrafted teak furniture since this is the least costly plus they are made by artisans.
Check for Grade A
Of course, you would want to have teak furniture that is Grade A. These are those pieces that are warm honey colored. They also show close grains and seem to be oily to your touch. You would also feel that the wood is dense.
Grade A teak wood is harvested from mature trees, therefore, they are expected to be sturdier and naturally more resistant to the elements.
If you look close enough, you would even be able to notice just how glossy Grade A teak wood seems to be.
Check for Chemically-treated Teak
There are some teak logs that are treated with sulfuric acid. This is done so that the patchy appearance of the wood is finally made even.
Never buy chemically-treated teak. Not only does it show a homogenous color but it also contains dangerous particles that could cause skin burns.
Hydrogen peroxide is another kind of chemical that is used to treat teak. This is done so that low-grade teak is disguised. While this does not have any effects on a person’s health, still, it degrades the natural oiliness of the wood, making it brittle and weak.
Check for Kiln Drying
Good teak wood is always defined by its grade. Grade A teak should be kiln-dried if you want it to last for a long time. Kiln-drying is technically placing wood inside ovens and slow-drying them. Teak needs to be dried or seasoned so that its moisture content is greatly reduced. It is also a time-consuming process but one that can guarantee you a durable furniture piece.
Tags: McCreerys, McCreerys Home Furnishings, patio, patio furnishings, patio furniture, patio furniture buying guide
Posted in Furniture, Interior Design 101, Interior Design Elements, Outdoors Style | Comments Off on 6 Teakwood Patio Furniture Buying Tips
Wednesday, August 29th, 2018

Cynthia Rowley for Hooker Furniture Living Room Walker Exposed Wood Chair would look great on a painted flooring.
Are you considering painting your porch or even your home’s interior? This project is best when you use a latex or oil-based formula, although, the project tends to last longer with the latter. Be sure to check with your area for any oil-based restrictions.
Consider the Flooring Type
Hardwood flooring can take on a coat or two of paint. But before you do this, though, there is a need for you to test the paint with the flooring material for compatibility. Paint just a small inconspicuous section at first or you may utilize a sample slat for now.
Interior concrete can be painted with latex or oil-based paints. Yet again, conduct a test prior to painting. Check for porosity so you can determine if a wax coating or a sealer was used. Check also for moisture in areas that are constantly subjected to dampness.
Remember this – you must never apply paint for zones that have pooled water.
Laminate flooring, vinyl, and linoleum may or may not be painted. Most contractors do not recommend that these materials are left alone but if you really have to paint them, then use an oil-based paint.
Any existing floor finish especially shellac, lacquer or varnishes should be tested for paint compatibility. If you see lifting, wrinkling or bubbling as a result of painting, then this is an indication that you need to remove the finish first before paint application is done.
Prep the Floors
As soon as the tests are done and you had good results, then it’s time to prepare the flooring for the painting job.
First, sand your hardwood, painted or laminate flooring. Use a 120-150 grit paper to ascertain the highest degree of adhesion. Vacuum the floor then clean with TSP or trisodium phosphate to remove any kind of contaminant.
Let dry.
Here’s a word of caution – if you’re removing a pre-1970s paint, it could contain lead so be sure to wear a respirator. Clean the area with a HEPA vacuum and then finish with a wet mop. Just to be on the safe side, ask the help of professionals.
Another way to prepare the floor is to move floor coverings and furniture. Keep the children and pets away from the painting task.
Pick a Color Palette
Floor enamel and porch paints come in over a thousand colors. And with a sixth portion of your home (the flooring), you need to carefully choose the hue that best suits your theme.
When you have a flooring that just needs a different color but is still in great condition, then you should look for complementary hues based on your draperies, bedding, slipcovers, and just about every design element that you already have in place.
The room’s color scheme is the easiest way to pick a hue for the flooring, too, but this isn’t the only way. Consider also how the floor color could impact the rest of the design elements. If you’re committed to the current color, then it’s going to be easy to pick your floor color. If you want to alter the look, then consider your color preference and the paint’s longevity.
Pick a Finish
There are two kinds of floor and porch paints – the latex enamel and the oil-based types. The latter provides a high-gloss finish while the former comes in low-sheen and gloss finish.
There’s no need for primer paint on your porch. For a floor that’s currently painted with oil-based paint, just recoat it with a latex floor or porch paint.
Another word of caution – never cover a latex-painted flooring with an oil-based paint.
It’s Time to Paint
Once you’re through with all of the above steps, then it’s time to paint. We previously posted about floorboard painting.
Tags: floor painting, McCreerys, McCreerys Home Furnishings, painting the floors
Posted in Color Schemes, Flooring Design, Interior Design 101, Interior Design Elements | Comments Off on The Art and Science of Concrete Floor Painting
Tuesday, August 28th, 2018

iComfort® by Serta Mattresses Epic™
What facial expression do you make when you hear about bed bugs? That’s right, they’re worth a thousand blench. And, yes, these pests need to be eradicated right away but they are so good at surviving because they crawl, jump, and they can even fly. So what needs to be done?
Know Your Enemy
It is important that you get to know what you’re up against. These little oval insects feed on the blood of warm-blooded animals. Humans are warm-blooded, ergo, they get fed on. These can also live in any area in your home, not just your bedroom. So check out for them in those tiny cracks and textiles.
Bed bugs love to infest box springs, mattresses, and bed frames, though. It’s because they are nocturnal creatures that are most active during the night.
Fortify Your Home
Very first on the list is this – do not buy second-hand furniture. Invest only in the best kinds of mattresses and be sure to protect these with a cover that will encase the box springs and the mattress itself. High-quality encasement is able to resist tearing, thus, the possibility of a bed bug infestation.
Say Goodbye to Clutter
Treat clutter like an enemy. And this enemy of yours is the best friend of bed bugs since they tend to live in dirty areas. Be wary of those crevices and cracks but be more wary of keeping the clutter to zero. Plus, having less to zero clutter means the problem can be easier to solve when the exterminators finally come.
Another way to keep your bedroom and the rest of your home clean is to frequently vacuum. While this is not a hundred percent effective in getting rid of bed bugs, still, it is an equipment that can capture majority of these pests’ population.
Vigilance in Laundering
You have to be very vigilant when you’re sharing laundry facilities. Use plastic bags in transporting the items that are about to be washed. If there is already an infestation in your home, then be sure to use a new plastic bag when you go home.
If you live in a multi-family facility, then be sure to isolate your space with door sweeps and sealing crevices and cracks. And if you can, invest in a mobile heating chamber in order to treat items that are probably infested.
The Anti-Bed Bug Mattress
Now let’s just be clear here. There isn’t a single mattress that’s a hundred-percent bed bug-free. It’s because these insects can sleep in almost virtually anything – in seams, tufts, and even under your sheets.
But, here’s the thing, it has been observed that highly dense materials such as those used on latex and memory foams keep the bed bugs out of the center of the mattress. Also, it pays that you purchase a good cover for your mattress. The best covers can even help you spot an infestation (although, let’s hope this is prevented rather than treated) and even contain them while waiting for the exterminators to arrive.
Here’s the thing – bed bugs hate certain chemicals and heat so you could go straightaway to professional extermination.
Let’s Shop
If you’re thinking of buying a memory foam mattress, then you have to know that there’s a lot of them out there. The traditional memory foam is the one that’s designed to provide a cradling support that decreases stress on joints while also enhancing circulation.
The open cell type responds more quickly so you don’t feel like sinking when you lie down at night. The gel memory foam is best at dispersing heat.
You may also consider shopping for latex, high quality innerspring, and natural fiber mattresses.
Tags: bed bug prevention, McCreerys, McCreerys Home Furnishings
Posted in Bedroom Design, Home Maintenance, Interior Design 101, Interior Design Elements | Comments Off on Solving the Bed Bug Problem…For Good
Monday, August 27th, 2018
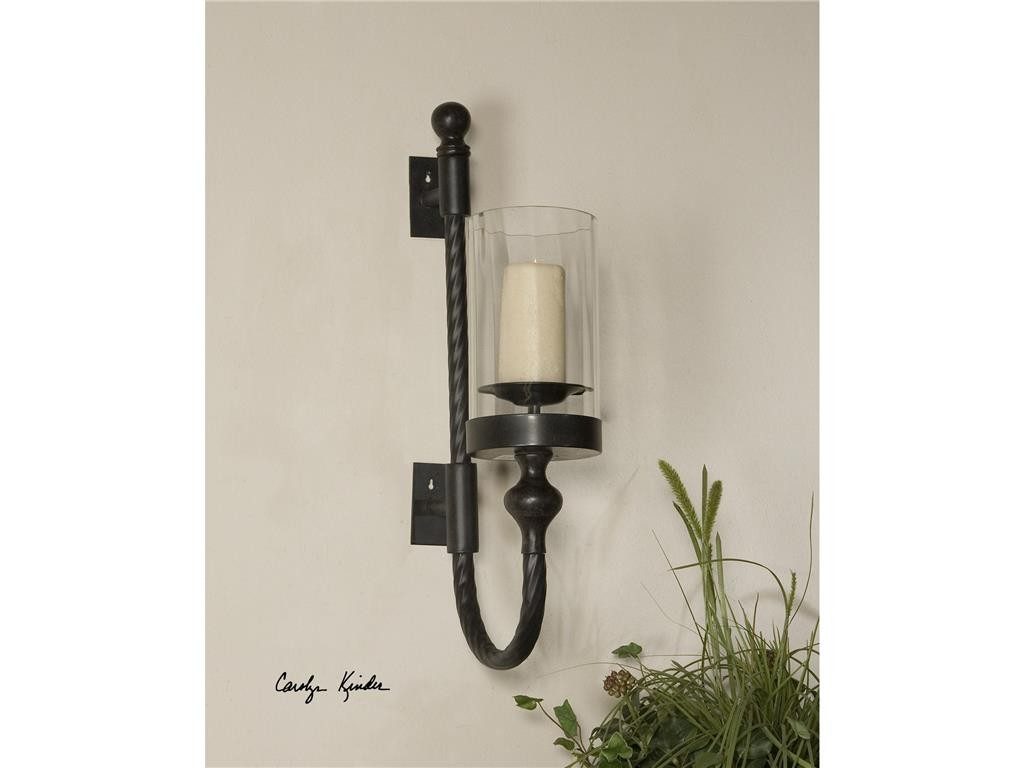
Did you say intimate? Featured here is the Uttermost Accessories Garvin Twist Sconce With Candle 19476.
One of the critical elements that you should consider in every dining room is correct lighting. Take note, it’s not just lighting but the right kind of lighting so that you’re able to create an equally correct atmosphere. There are some lighting tips that are meant just for your kind of dining room –
The Supper Zone
If you happen to spend most of your nights rather than your daytime in the dining room, then you should look for lighting that is dramatic. Low-level lighting is what you should be looking for so that you’d create an intimate space.
There are special bulbs and lighting fixtures that cast a romantic shadow. Look for those. An elegant lantern can give your dining room the level of sophistication that it needs. A multi-arm chandelier would be best for ornate designs. While the starburst is perfect for that roundtable that you fell in love with.
For the modernist romantic, you can go for crystal lighting or just about any shape that speaks to you.
Begin at the Top
Think of the dining room lighting as the centerpiece of that space. Since this is so, you have to take every opportunity to make a statement. When you have a rectangular table, find a linear chandelier or several pendants which should run the entire table’s length.
A roundtable, on the other hand, should have a group of mini chandeliers or pendants. Pick LED-lit chandelier if you want a white light to be cast throughout the room.
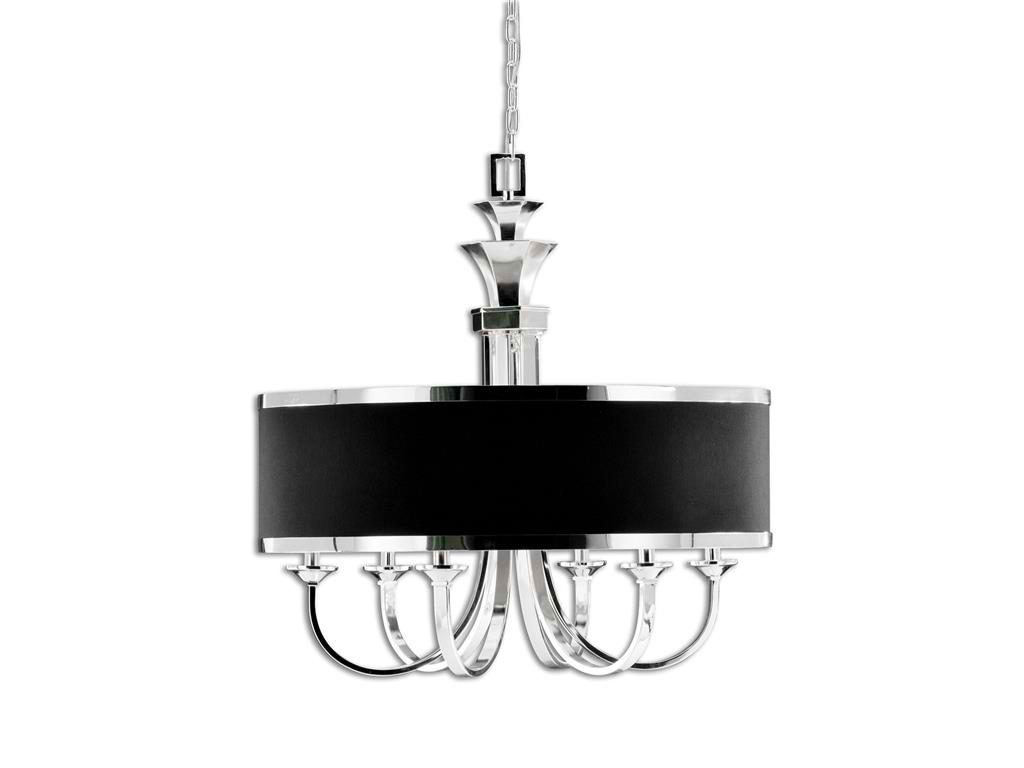
Or linear and modernized? Here’s the straightforward beauty offered by the Uttermost Lamps and Lighting Tuxedo, 6-Lt Single Shade Chandelier 21130
The Table Is the Anchor
Another crucial thing to remember is that you have to consider the table as the basis for your lighting decisions. You have to do this because people gather around this one piece of furniture while the rest of the space recedes when a meal is served.
This means you can go for an interesting pendant, the traditional chandelier or a series of pendants. Just make sure, each time, that the bottom of the lighting fixture must be 36 inches from the dining table surface.
Large Pendant, Small Dining Table
Work with scaling especially around the dining table. The bigger the lighting fixture, most designers agree, the better. If you have a small, round table, match it with a pendant light that catches attention. Alternatively, you can also invest in multiple pendants that are asymmetrically numbered.
As for your rectangular table, look for a chandelier or, yet again, a series of pendant lights. The longer the table, the more that you need to create a row of lights that would run its length. It is always best to go for odd numbering rather than the matching look of even-numbered lights.
Zone Demarcation
Be sure to use a large pendant when you signed up for an open space layout. This one piece of lighting fixture can help you create zones in your home. This huge pendant would help focus eyes even during the day.
Use Dimmers
Light controls can effortlessly increase the level of comfort in your dining room. Dimmed lights do not just use less energy but they also create the perfect, intimate ambiance that you would want at night. Sure, go ahead and flood the dining room with daylight but, come night, be sure to achieve the right atmosphere by having just the low-level kind of warm light.
Plus, dimmed lighting looks pretty, too, so just go for it.
Don’t Forget to Layer
Just a single source of light would be too intimate while having a lot at the wrong spots could also be glaring. Having more than one lighting source gives you more options in terms of creating moods. So go ahead and have a table lamp for that sideboard or some wall sconces to match that large pendant.
Tags: dining room light, McCreerys, McCreerys Home Furnishings
Posted in Accents, Accessories, Dining Room Design, Interior Design 101, Interior Design Elements, Lighting | Comments Off on The Inseparable Dining and Lighting
Friday, August 24th, 2018
The linear candelabra paired just right with the beauty of these Humphrey Bogart dining room collection.
That pair of candlesticks that has multiple arms is what’s referred to as candelabrum (with the plural form of candelabra, although, it has become acceptable to call it as candelabra as a singular thing with candelabras as its plural form).
Candelabrum refers to candle-tree. This is a Latin word that was so-named because of its arms or branches. The candelabrum became a need before the advent of electrical light. At the time, it was imperative to have more than one candle in a room in order to brighten up space especially when the homeowners needed to do some reading or writing during the evening.
Originally, the candelabrum comes with one supporting column that holds 2-4 branches or arms. The arms could be removed as desired and the column was then just able to hold one candlestick.
Many homes used the candelabra and displayed them prominently in their homes. To some, these even became a status symbol of sorts. With greater illumination provided by this one element, it became apparent for craftsmen to stylize it.
The candelabrum became even more popular in the 1800s when silver was already used as the leading material in creating this lovely lighting piece. By that time, the candelabra have all become a substantial part of homes’ décor especially in the dining room and the living room. With seated guests all around, the candelabra allowed for people to have conversations when there used to be just darkness.
While candles have been around since 3000 BC, the display of light has become sort of a necessity. In 400 BC, there has been evidence of clay candelabra. Today, these can be practically made from any material including gold, silver, copper, brass, crystal, and iron.
The use of the candelabrum as a lighting piece died in the 1870s when the light bulb was already invented. By then, it has just become a decorative piece, one that evoked romance and intimacy.
Candelabra Types
The arms of the candelabra made the huge difference on how each piece would look. There are those that have as many as eight arms and even the grander ones that display a lot more than this. The more elaborate candelabra are now typically found in museums.
The ones that have more arms have been given wider bases in order to support the more numerous branches. The styles and types of the candelabra were different based on the era when they were created. So, for instance, if the prevailing fashion for dining at a certain time was silver, then the candelabra were patterned to these pieces.
As years passed, the designs became more refined and as the modern and contemporary eras came, the look of these lighting pieces also changed with the times. Going back to the simplistic design of the George I candelabra which was linear and angular, it was highly contrasted by the George II style which had a lot of embellishments and decorative parts.
This constant evolution paved the way for finer pieces being produced in the latter years. Probably the most renowned candelabrum is the Menorah which has seven branches. This is a symbol of Jewish faith and, in fact, is so old that it was even mentioned in the Bible.
Candelabra are now considered synonymous with opulence. Buyers should just know how to invest in the best ones and to maintain them so that they can last for many years.

The Uttermost Lamps and Lighting Rudra Antiqued Silver Candelabra 18909 has a modern flair that sits just right in a modern home.
Candelabra: Damage Prevention
Of course, you should be careful with the types of candles that you would use. To prevent stains and drips, use quality, non-petroleum based ones.
As soon as the drips harden, be sure to remove them as fresh wax is more pliable. Wear gloves as you touch the candelabrum.
Never use water to clean the candelabra.
Tags: candelabra, candelabrum, cleaning the candelabra, McCreerys, McCreerys Home Furnishings
Posted in Accents, Accessories, Interior Design 101, Interior Design Elements, Lighting | Comments Off on The Candelabra: Creating An Intimate Setting
Thursday, August 23rd, 2018
Fine Furniture Design Summer Home Poster Queen Bed.
So what are the most common types of clutter in your home?
Clothes?
Your kids’ toys?
Or books, perhaps?
No matter, clutter is clutter and since it’s summer, you might as well do some summer cleanup.
Summer signifies the acquisition of too many stuff. This is that season when people tend to own a lot more. This is also that time when out-of-town guests leave some of their items and also when the past holidays have left celebratory stuff.
Summer can also be the time to prepare for events and to hold them in your home. Since most people are up and about and are so busy, they tend to be less inclined to do the cleanup. But this should not be the case in your household.
It is time to say no to summer clutter.
Bye-Bye Books
Whether you’re cleaning up your eBooks or your literal book pile in your home, it’s time to accept the fact that you don’t get to read all these books anyway so it’s time to throw or give away some of them.
Now, let’s face those bookshelves holding your to-be-read file. Be honest with this file. And actually read the books that you include on this list. For those that you won’t really read anyway, just have them donated. Some people will be more blessed to have them and actually read them.
Do you have duplicate copies of certain books? Then it’s time to keep just the one that you want. As for the tattered books, well, they’re not just not good for Feng Shui but also a complete eyesore. It’s time to have them replaced. Bookshelves look unkempt with such books included in your collection.
Farewell to Vacay Purchases
So that wide-brimmed hat is not going to be a regular part of your wardrobe, right? Then it’s time to have someone else enjoy it. What about those sunscreen sprays? Have you, somehow, managed to create a collection of different bottles and tubes?
It’s summer but it’s also the time to let go of these used and possibly even empty products and other stuff. Pick the ones that you will still surely use then say goodbye to all of the rest.
Goodbye to Memorabilia Posers
There is real memorabilia and there are those that are just posing to be memorabilia such as ticket stubs, menus, foreign money, etc. Learn to categorize the real mementos and those that just become garbage.
Most of the time, the drawers are homes to these kinds of stuff. These items tend to co-exist with the office items. Let go of those receipts, shoe laces, book tags, bag tags, hotel key cards, and even broken cell phones and necklaces.
Take a few minutes to review these items in the drawer then get a black bag and say bye-bye.
Kitchen Cleanup
You’re going to be busy in your kitchen so you might as well prep for those taxing days ahead. Prep that grill by having it cleaned and brushed. Make sure also that the utensils have been thoroughly cleaned. Check also your cooking equipment and appliances – the oven, refrigerator, stove, baking tools, etc.
Remember the Garage
How about a summer cleanup in your garage? Maybe this site only gets cleaned during spring and it’s high time that you change that. Always begin cleaning from the top then work your way down to the garage floor.
Find a broom to remove cobwebs and to clean the lighting fixtures. Check also if the windows and garage door already need to be oiled.
Store Other Season Gears
Time to pack those coats, scarves, and sweaters now that the sun is out and shining. You could vacuum pack these stuff until that moment when you will need them again.
Tags: decluttering, McCreerys, McCreerys Home Furnishings, summer cleanup, summer declutter, summer decluttering
Posted in Home Maintenance, Interior Design 101, Interior Design Elements, Summer Season | Comments Off on 6 Super Hot Summer Decluttering Tips
Wednesday, August 22nd, 2018
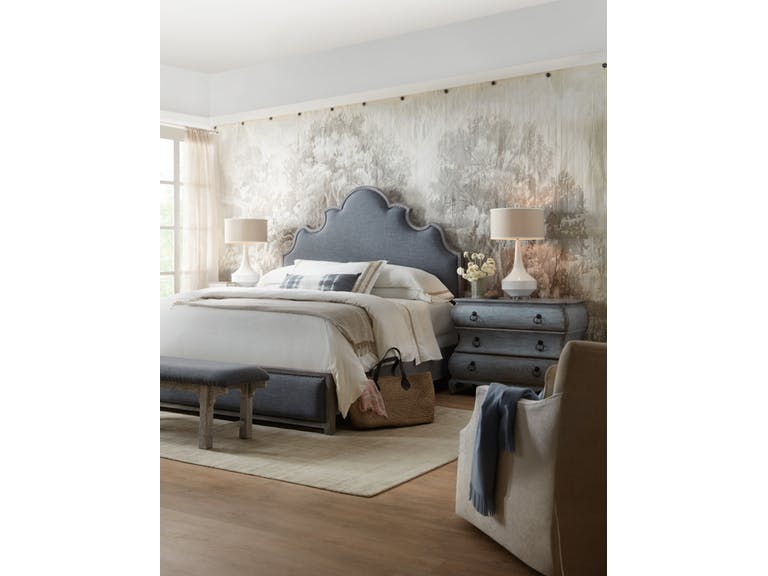
Whether you’re doing a guest bedroom, bathroom or a kitchen remodel, it pays to be a good neighbor throughout. Featured in this photo is the upcoming Hooker Furniture Bedroom Beaumont King Upholstered Bed.
The remodel or renovation of a home can have a huge impact on any homeowner’s life. The stress could come from the anticipation of the project or it could be because your neighbors aren’t as cooperative as you wanted them to be. These are your neighbors and so it is, of course, crucial that you build a positive relationship with them. So what could you do to still be the perfect neighbor when you’re about to remodel?
Okay, remodeling a home entails loud noises, debris, and lots of mess. There could also be a time when the street becomes less spacious because the parking could be eaten up by the goings-on during the renovation.
Whether you’re planning to remodel the bathroom or the roof, this type of extensive project could literally change your lifestyle as well as your neighbors’. You might just think of the immediate impact to your family but there are, inevitably, effects to your neighbors, too.
Be kind and here are some ways that you can be nice to them during the construction phase –
Get Necessary Permits
It is a courtesy to your neighbors to get all the necessary papers for the remodel. This will ensure everyone in your neighborhood that you are abiding by the local building codes. This becomes doubly important when you have plans of selling your house someday.
Your neighbors will also be ascertained that your safety and theirs have been considered. Just make sure that you display the permit on the window where your neighbors can best see it. This is to deter any possible questions that they may have if this piece of paper is absent.
Inform the Neighbors
As a part of the neighborhood, it is your responsibility to inform the nearby homes of the upcoming remodeling project. You don’t have to knock from one door to the next, though. You can just write a letter detailing the part that’s going to be remodeled in your home, why you’re remodeling, and the timeline for this project.
You should also include your contact information. You could also thank them by sending some baked goods (yes, these are very effective in mitigating concerns). There are also communities that have their own regulations on whom to notify when you will remodel.
Notify two to three houses down.
Emphasize the Work Hours
One of the most important parts of your letter is that section where you write the work hours as well as the project timeline.
Will the workers do the construction tasks during the morning? Normally, the construction hours take about 12 hours each day so, ideally, it should be between 8:00 AM to 8:00 PM. The contractor must be informed of your preferred work hours so that they do not end up annoying your neighbors who are expecting that the noise would stop at a certain time.
Contain the Mess
Deck or roofing installations could create a huge mess. These projects involve demolishing parts of your home and some scraps building up in your yard. Some of this debris could get to your neighbor’s lawn – this is what you would not want to happen.
Tell your contractors to be respectful of the nearby properties. Check on your shortlisted contractors’ cleanup processes so that you get to choose the one that creates the least impact on other people’s homes.
Be Gentle and Considerate
Even when you prepared amply, there could be complaints from neighbors who will not be happy with the ongoing remodeling project. Instead of reacting straightaway, you could sit down with your neighbor and come up with a solution. Have your neighbor speak to the contractor who would be able to explain to them what’s going on and for how long.
Be sure to thank your neighbor for bearing with the inconveniences.
Tags: home remodeling, home renovation, McCreerys, McCreerys Home Furnishings, reconstruction, remodeling, renovation
Posted in Interior Design 101, Interior Design Elements | Comments Off on Remodeling Around Not-So-Sweet Neighbors? 5 To-Do’s During Renovation
Follow us on our social media
© McCreery's Home Furnishings | All Rights Reserved | Privacy Policy